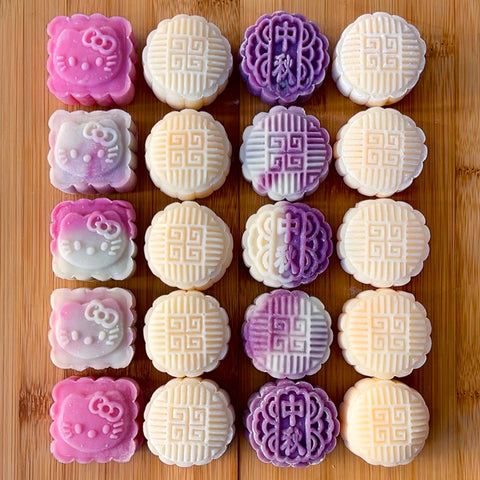
Marble & Hello Kitty Snowskin Mooncakes
We're just days away from the Mid-Autumn Festival!! We've been blessed with bountiful mooncake recipes, and we'll be more than happy to taste test them all! It's a good thing that snowskin mooncakes are so versatile that there can be endless variations on this delicacy. Mooncakes are a long-standing traditional, cultural delicacy and can be a little laborious to make. Luckily, the newer version, snowskin mooncake requires no baking whatsoever and are the perfect vessel to add fun and bright colors to your celebration. Marvel at the beautiful marble effect made with Suncore Foods® Powders and drop a friendly “hello! to the quaint design commemorating a world-famous cartoon character we all know and love! So cute and tasty looking, we can’t decide which to devour first—lotus, custard, or sweet potato.

Ingredients
Skin Ingredients:
50g glutinous rice flour
50g rice flour
30g wheat starch
50g powdered sugar
230 ml milk
30g sweetened condensed milk
30g oil
10g Suncore Foods® Lilac Taro Yam Powder
10g Suncore Foods® Red Beet Powder
10g Suncore Foods® Purple Sweet Potato Powder
50g glutinous rice flour (for dusting)
Custard Ingredients:
100g softened unsalted butter
65g white granulated sugar
4 eggs
80g dry milk powder
40g wheat starch
Directions
1. In a medium saucepan, heat 50g glutinous rice flour over med-low heat. Stir constantly until it has a very slight yellow tint, transfer it to a small bowl, and set aside.
2. Pour 1 inch of water into a steamer, and bring to a boil.
3. Combine glutinous flour, rice flour, wheat starch, and powdered sugar in a medium mixing bowl and mix. Pour in the milk and whisk until there is no visible dry flour. Add in the sweetened condensed milk and oil, and stir well. Transfer mixture to a thin heat-safe bowl. Place into steamer, cover bowl with a heat-safe plate, cover pot with its lid, and steam for 25-30 minutes.
4. Using oven mitts or towel, carefully take out bowl from the steamer. Slice into steamed dough using a rubber spatula. Dough is ready when no liquid emerges. If there is liquid, steam for 5 additional minutes and check again. Oil is normal to see gathering on top of the dough. Continue slicing through to help dough release from the bowl. Transfer it to a large mixing bowl, and let cool.
5. Knead dough by hand using rubber gloves once it has cooled enough to handle. Dough will feel oil and sticky. Continue kneading until dough loses its shine and becomes smooth. Wrap with cling wrap, flatten into a thin disc, and chill in fridge for 2 hours.
6. As dough chills, let’s prepare the custard. Using a hand mixer, beat butter and sugar together in a medium mixing bowl. Color will start to pale. Incorporate eggs into the mixture one at a time. Custard will look very lumpy and separated. Add in milk powder, wheat starch, and mix until smooth.
7. Transfer custard mixture into a medium nonstick saucepan. Stir constantly on med-low heat with a spatula, making sure to scrape the sides and bottom. As it thickens, custard will pull away from the pan and become a dough-like consistency. Turn off the heat and place custard into a shallow bowl. Cover with cling wrap, making sure wrap is touching the top layer of the custard. Let cool until it comes to room temperature, then chill in fridge while you roll out the skin dough.
8. Unwrap dough disc and knead in powder to achieve desired color. Separate into desired pieces using a knife or bench scraper. Roll into balls and dust lightly with cooked glutinous flour. Be sure to cover dough balls you’re not working with to prevent from drying out.
9. Grab the custard mixture out of the fridge. Using a spoon or small spatula, measure out desired filling and roll into balls. If custard is sticking to your hands, place back into fridge to chill.
10. Pick up dough ball and roll out evenly until it’s slightly bigger than the filling, about the size of your palm. Place filling in the center, invert it, and slowly wrap the filling evenly, pushing down on the dough from all sides as you rotate. Seal by pinching dough closed, then give the ball one last roll with your palms.
11. Dust filled dough and mooncake mold lightly with cooked glutinous rice flour, making sure to shake away all excess flour. This ensure the mold design will shine through.
12. Shape filled dough slightly narrow to ensure it will fit in the mooncake mold. Place mold over the dough until it’s fully encasing it, press down to stamp it, then pull up to release. Dust mold and doughs as needed as you stamp the rest of the filled dough balls. Seal in airtight container. Mooncakes can be eaten fresh, but best if chilled overnight. ENJOY!
