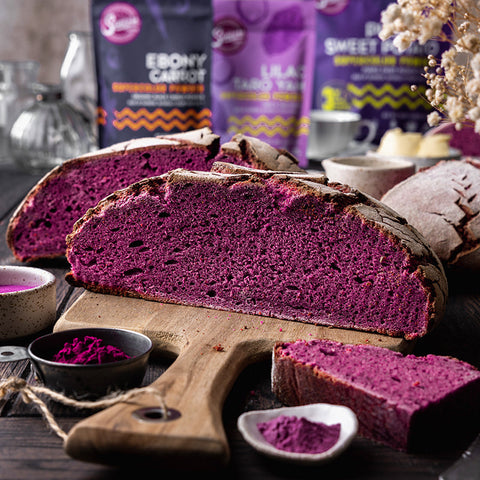
Gluten-Free Violet Purple Sourdough
Nothing beats the smell of fresh bread baking in the oven, filling the air with warmth, happiness, and of course deliciousness! This vibrant Gluten-Free Violet Purple Sourdough is love-made edible. Add fun and color to your classic sourdough with Suncore Foods® Ebony Carrot, Lilac Taro Yam, and Purple Sweet Potato Powders to achieve this rich, bold, luxurious purple hue. Happiness is knowing there's bread in the oven. Let dough this! Have fun and time to get baked.

Ingredients
Levain Ingredients:
30g gluten-free sourdough starter
115g water
35g buckwheat flour
60g rice flour
Loaf Ingredients:
375g water
30g flaxseed meal
12g arrowroot starch
245g levain
50g sugar
22g olive oil
85g tapioca flour
210g gluten-free oat flour
170g rice flour
150g gluten-free 1-to-1 flour (+ more for dusting)
12g salt
24g Suncore Foods® Ebony Carrot Powder
9g Suncore Foods® Lilac Taro Yam Powder
7g Suncore Foods® Purple Sweet Potato Powder
Equipment Needed:
Stand mixer with a dough hook attachment
Dough scraper
Banneton
Scoring blade
Dutch oven
Directions
Directions:
1. Prepare Levain — In a jar, combine levain ingredients and set aside for 5 hours. Note – instead of using buckwheat and rice flours, you can also use the flours used to make the starter.
2. Make the Dough — In the bowl of a stand mixer, combine water, flaxseed meal, and arrowroot starch. Set aside for 5 minutes, lightly stirring every 2 minutes. Add levain, sugar, and olive oil and stir on low speed for 30 seconds a minute. Mix in all four flours, salt, and Suncore Foods® Powders. Mix on low speed until well combined. The dough will be sticky and will not separate from the sides of the bowl on its own.
3. Dust a generous amount of 1-to-1 flour on a clean work surface and rub some oil onto your hands. Transfer dough to the work surface and using a dough scraper and your hands form a misshapen dough. Dust some more flour as and when needed.
4. Bulk Fermentation — Transfer the dough to a large well-oiled bowl. Tightly seal the bowl with cling film. Set aside for 10-12 hours, ideally overnight. If your kitchen is warm, set aside for 10 hours. If your kitchen is cool, set it aside for 12-14 hours.
5. Shaping 1 — Transfer the dough onto a well-floured surface and dust some flour onto your hands. Knead the dough for 1 minute and form a dough ball. Allow the dough to remain on the work surface and cover with a kitchen towel for 30 minutes. The dough will be soft.
6. Shaping 2 — Follow the same process and re-knead and re-shape the dough. Cover and set aside for 25 minutes. With each shaping, the dough will become slightly tighter.
7. Shaping 3 — Follow the same process and re-knead and re-shape the dough. Cover and set aside for 20 minutes.
8. Proofing — Transfer the dough to a well-floured banneton, cover with a kitchen towel and set aside for 1-2 hours.
9. Preheating — Place a Dutch oven placed on the middle rack of your oven, and preheat the oven to 500º F for 30 minutes.
10. Scoring — Turn the dough onto parchment paper and dust some 1-to-1 flour onto the dough. Using your hands, gently spread the flour over the entire dough. Using a scoring blade, gently score the dough using just the tip of the blade. The easiest scoring is to make a + across the dough.
11. Baking - Practice extreme caution: Lift the parchment paper and transfer dough into the Dutch oven. Cover the Dutch oven with the lid and bake for 20 minutes with the lid on. Remove the lid and reduce the oven temperature to 450º F and bake for 25-35 minutes. The baking time varies from oven to oven. Bake the bread till the crust is crispy and golden-brown and the loaf should sound hollow when you tap on it.
12. Cooling — Allow the loaf to cool down completely before slicing.
